How to Set Up SPF, DKIM, and DMARC for Cold Email: A Non-Technical Walkthrough
HotHawk is cold email software for serious outbound teams.
Special offer
Get 50% more sending, FREE.
50% extra sending on any plan, every month.
On this page
SPF, DKIM and DMARC are three DNS records that prove your email is really from you. Together they’re email authentication, and in 2026 they aren’t optional. Send cold email at any volume without all three and a growing chunk of it gets rejected outright, not just filtered to spam. The good news? It’s a one-time setup, and you don’t need to be technical to do it.
This walkthrough explains what each record does in plain terms, then sets them up for Google Workspace, Microsoft 365 and a custom SMTP setup. You’ll be editing DNS records at your domain registrar, which sounds scarier than it actually is.
The short version
- SPF, DKIM and DMARC are DNS records that prove your email is legitimate and unforged.
- All three are required for sending at volume now; miss any one and you get failures.
- SPF lists who can send for you, DKIM signs the message, DMARC ties them together.
- Set them up once per sending domain at your DNS provider.
- Start DMARC at p=none to monitor, then tighten to quarantine or reject.
What each record does
Before you touch DNS, it helps to know what you’re actually setting up:
- SPF (Sender Policy Framework) is a list of the servers allowed to send email for your domain. When a provider gets your mail, it checks the sending server against that list.
- DKIM (DomainKeys Identified Mail) adds a cryptographic signature to every message. The receiving provider uses a public key in your DNS to confirm the message really came from you and nobody altered it in transit.
- DMARC (Domain-based Message Authentication, Reporting and Conformance) ties SPF and DKIM together. It tells providers what to do when mail fails the checks, and it can report back on who’s sending as your domain.
Think of it as identity, integrity and policy. SPF says who you are, DKIM proves the message is intact, DMARC sets the rule for failures.
Before you start
You’ll need two things: the admin console for your email provider (Google Workspace or Microsoft 365), and the DNS settings for your domain at your registrar (Cloudflare, GoDaddy, Namecheap, whoever). DNS changes can take a few hours to take effect, so set them and give them a bit of time before you test anything.
Setting up SPF
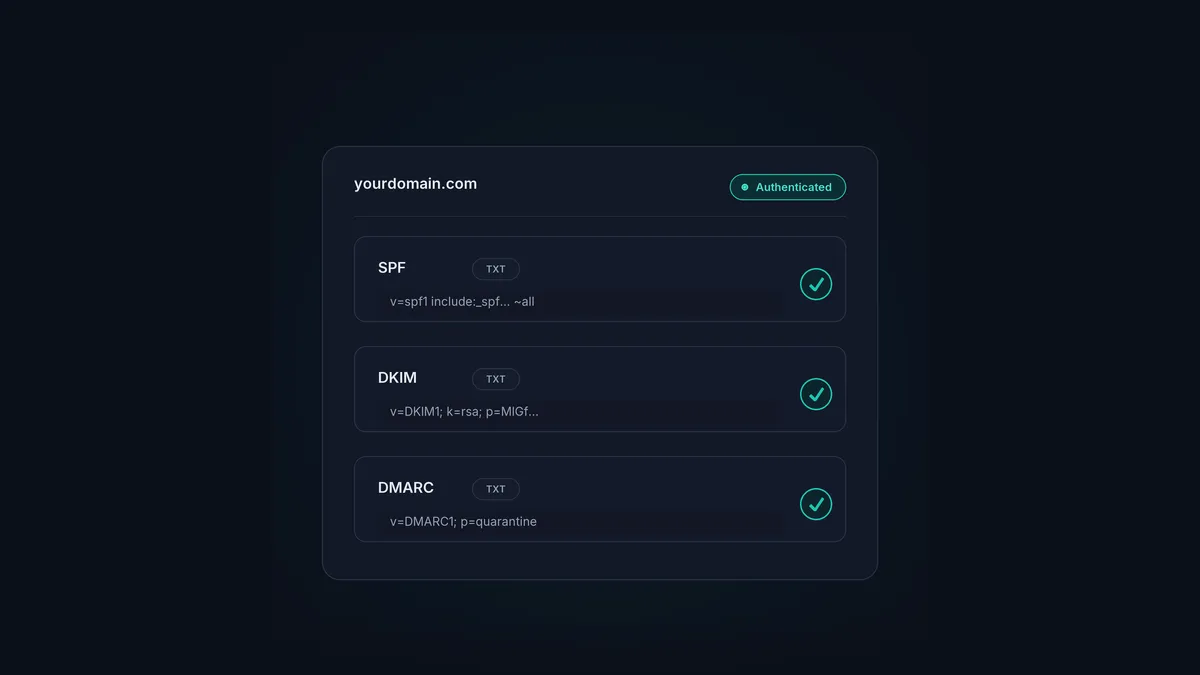
SPF is a single TXT record on your domain.
- Google Workspace: add a TXT record with the value
v=spf1 include:_spf.google.com ~all. - Microsoft 365: add a TXT record with the value
v=spf1 include:spf.protection.outlook.com -all. - Custom SMTP or a sending tool: include the provider’s SPF domain, for example
v=spf1 include:theirdomain.com ~all. Your sending tool will give you the exact value.
One rule you can’t break: only one SPF record per domain. If you send through more than one service, merge them into a single record with multiple include: statements. Never two separate records.
Setting up DKIM
Your email provider generates DKIM, then you publish it as a DNS record.
- Google Workspace: in the Admin console, go to Apps, Google Workspace, Gmail, Authenticate email. Generate the DKIM key, add the TXT record it gives you to your DNS, then come back and click Start authentication.
- Microsoft 365: in the Defender portal, go to Email and collaboration, Policies, Email authentication settings, DKIM. Enable DKIM for your domain and it hands you two CNAME records to add to DNS.
- Custom SMTP or a sending tool: the tool generates the DKIM key and gives you the record to publish.
Once it’s published, switch on DKIM signing in the provider so your outgoing mail is actually signed.
Setting up DMARC
DMARC is one more TXT record, on the subdomain _dmarc.yourdomain.com. Start gentle:
v=DMARC1; p=none; rua=mailto:dmarc@yourdomain.comp=none means “don’t block anything yet, just report back”. That lets you watch the reports for a week or two and confirm your legitimate mail is passing, without risking real email getting blocked. Once you’re confident, tighten it up:
p=quarantinesends failing mail to spam.p=rejectblocks failing mail outright.
Providers now expect bulk senders to be moving toward quarantine or reject, not parked on none forever. Step it up in stages and check the reports each time.
After setup: verify and move on
Once the records have propagated, confirm they’re working before you scale. Fire a test at a checker, or use the methods in how to test your email deliverability, and keep half an eye on your DMARC reports for a couple of weeks.
Authentication is the foundation, but that’s all it is. A perfectly authenticated domain still needs warmup, a clean list and sensible sending to actually reach the inbox. It’s one layer of the full deliverability stack, and it protects your domain reputation rather than guaranteeing placement on its own.
Authentication is step one
Once your domain is authenticated, HotHawk handles the rest of deliverability: native warmup on real inboxes and automatic inbox rotation to protect your reputation as you scale.
See how warmup worksA few common questions
Do I really need all three of SPF, DKIM and DMARC? Yes. For sending at volume in 2026, all three are required. Mail missing any of them increasingly gets rejected rather than just filtered, because providers read incomplete authentication as a spam signal.
Can I have more than one SPF record?
No. A domain can only have one SPF record. If you send through multiple services, merge them into a single record using several include: statements. Two separate SPF records will break authentication.
What DMARC policy should I start with?
Start with p=none to monitor without blocking anything, watch the reports to confirm your real mail passes, then move to p=quarantine and eventually p=reject as your confidence grows.
Authentication is a one-time job that pays off on every send afterwards. Get SPF, DKIM and DMARC right, confirm they align, then build on top with warmup and good sending habits. For the full picture, start with the deliverability guide.
